SyncBack interfaces with the Windows Task Scheduler to allow you to run profiles automatically at certain times, e.g. run a backup profile every day at 5am. On Windows XP you can access the task scheduler via the Start menu (All Programs > Accessories > System Tools > Scheduled Tasks).
Page Contents
To create a schedule for a profile, select the profile on the main screen and click the Schedule button (you can also click the Schedule button when modifying a profile). If there is no schedule for the profile, a dialog box will appear (if you have a schedule already then a different window will appear - see Modifying a Schedule below).
There is no schedule for the profile 'The Name of Your Profile'. Would you like to create one?
Click Yes. If you are running Windows NT, 2000, or XP the following dialog box will appear (if you are using Windows 95, 98, or ME then this dialog box will not appear).
Please click the 'Set password...' button on the next screen to enter your login password.
If you do not enter your password the scheduled task will fail to run!
Users on Windows NT, 2000, and XP must tell the Windows Task Scheduler their login password to be able to run a program on a schedule, whereas on Windows 95, 98, and ME no password is required. This dialog box is a reminder to tell you to enter your password on the next screen (otherwise SyncBack will not run at its scheduled time). Click OK.
Please note that if you are using Windows XP and do not have a login password (i.e. it is blank/empty) then you must configure the Windows Scheduler to accept blank passwords. See This Question in the FAQ on how to do this.
Note that on Windows 95, 98, and ME this dialog box will look slightly different (there is no Set password button):

Also note that by default (from version 2.2) a profile is run minimized (hidden). This is done via the -m command line parameter. If you don't want to run minimized then remove that command line parameter from the Run string.
If there is a 'Set password' button then click it.
You must now enter your Windows login password twice, and then click OK. You are then returned to the previous dialog box.
It is critically important that your password is entered otherwise SyncBack will not be run at the scheduled time.
Click the Schedule tab.

By default, SyncBack will create a schedule to run the profile every day at 9am. You can change the schedule on this screen. See the Windows help file for more information. Click the Settings tab

See the Windows help file for more information on this screen. See the Important Scheduling Information section below for more information.
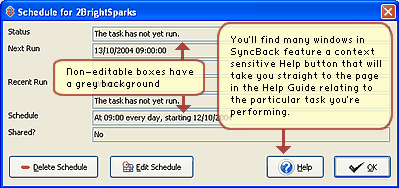
If you already have a schedule for a profile, when you click the Schedule button the following window will appear.

This window displays information on the schedule for the profile, e.g. what its schedule is and the current status. You can delete or edit the schedule by clicking Edit Schedule.
![]() Important Scheduling Information
Important Scheduling Information
There are some important points to remember about the Windows scheduler:
![]() On Windows XP, 2000, and NT make sure you set your password for the task.
On Windows XP, 2000, and NT make sure you set your password for the task.
![]() If you are using power saving features in Windows, e.g. your computer goes to stand-by or hibernate after a certain period of inactivity, then you must enable the 'Wake the computer to run this task' option in the scheduler. This will wake your computer to run the task at the appointed time.
If you are using power saving features in Windows, e.g. your computer goes to stand-by or hibernate after a certain period of inactivity, then you must enable the 'Wake the computer to run this task' option in the scheduler. This will wake your computer to run the task at the appointed time.
![]() You may need to be logged into Windows for the task to start at the scheduled time.
You may need to be logged into Windows for the task to start at the scheduled time.
![]() SyncBack can accept a number of Command Line Parameters.
SyncBack can accept a number of Command Line Parameters.
![]() For Windows XP, scheduled tasks will not run if your login password is blank/empty. Read FAQ.
For Windows XP, scheduled tasks will not run if your login password is blank/empty. Read FAQ.
![]() Windows NT 4 does not have a COM interface to the Windows Task Scheduler. You must use other methods to schedule profile runs, e.g. add it manually or use the 'at' command. See the Windows NT documentation for more information.
Windows NT 4 does not have a COM interface to the Windows Task Scheduler. You must use other methods to schedule profile runs, e.g. add it manually or use the 'at' command. See the Windows NT documentation for more information.
All Contents: 2BrightSparks Pte Ltd ⌐ 2003-2006